The Black Box Toolkit
User's Guide
bbtk version 0.9.0 (15/10/2008)
Generated on : Nov 12, 2008
Eduardo Dávila, Laurent Guigues, Jean-Pierre Roux
CREATIS-LRMN, Centre de Recherche en Imagerie Médicale
CNRS UMR 5220, INSERM U620, INSA Lyon, Université Claude-Bernard Lyon 1
http://www.creatis.insa-lyon.fr/creatools/bbtk
1 Introduction
1.1 What is bbtk ?
The Black Box Toolkit (bbtk) is a set of tools
(C++ libraries and executables)
providing a C++ framework for the definition
of elementary processing units, called black boxes,
and the definition and execution of processing chains
made up of these black boxes.
1.1.1 The black box philosophy
The Answers Dictionary defines a black box as
"A device or theoretical construct with known or specified performance characteristics
but unknown or unspecified constituents and means of operation"
Wikipedia
defines a black box as
"any component in a system in which only the input and output
characteristics are of interest, without regard to its internal mechanism
or structure".
We should merge these definitions. :
not only the inputs and outputs are of interest but also
what the box does !
Hence, we would say that a black box is any documented
component of a system, letting the user know
what the box is supposed to do and
how to use it
but not how it does it.
The Black Box Toolkit provides a systematic framework
to encapsulate (or "wrap") any
existing C or C++ processing code into an object
(a black box) having a generic symbolic interface, where
- generic means that the interface is the same
for all boxes. Hence one does not need to know which particular
method allows, say, to set a particular input or
get a particular output of the box.
One can use a black box in a purely abstract way.
- symbolic means that a particular
input or output is referenced by a 'name', that is by a symbol
which identifies the input or output.
It also means that symbolic information (text) is
attached to a box: description of the box, author,
description of its inputs and outputs, etc.
(Actually, genericity is achieved because the interface is symbolic.
We let you think about this...)
Of course, symbolic data attached to a box may be
queried : what are the inputs/outputs of the box ?
what are their type ? their description ? etc.
This allows automatic documentation of boxes.
The abstract definition of black boxes is the most basic
aspect of The Black Box Toolkit architecture.
Another key aspect is the groupement of black boxes into
so called packages,
which are dynamic libraries which can also
be queried, in particular about the boxes they provide.
The package structure then offers a mechanism which
is like a 'plug-in' mechanism.
The Black Box Toolkit provides the methods to load a package at run-time,
and create instances of the boxes it contains.
These two mechanisms (black boxes and packages)
then gives the way to:
- The definition of an interpreted script language,
which allows to manipulate packages and boxes very easily in symbolic way.
The Black Box Toolkit provides one : bbs (the Black Box Script language) and its interpreter
bbi (the Black Box Interpreter).
- Automatic documentation of existing packages.
html documentation of packages is proposed by
bbStudio.
Finally, these different components allow efficient :
- capitalization and reuse of existing processing units,
including documentation
- testing, prototyping in a very simple script language
- inter-operability between atomic processings which
have been written by different persons, using different libraries, etc.
1.1.2 bbtk components
The Black Box Toolkit includes :
- A C++ library - called bbtk - which defines a framework
(abstract classes) to develop black boxes and store them into
dynamic libraries, called black box packages.
- Different "core" black box packages :
- std : the 'standard' package including basic useful boxes.
- wx : basic graphical interface elements (widgets : sliders, buttons, etc. based on the wxWidgets library).
- itk : the basic image processing package, based on the itk library.
- vtk : the basic images and surfaces processing and visualization package, based on the vtk library.
- wxvtk : widget boxes based on the vtk library (2D and 3D vizualization and
interaction).
- toolsbbtk : Tools for bbtk administration and package development.
- A Developement environment, called bbStudio , which provides
- An online script editor and interpretor
- A powerful html Help environment, integrating :
- Online documentation scaning
- Retreiving boxes on various criterions
- Checking Demo and examples
- An standalone interpreter, called bbi, which allows to
execute bbs scripts or commands.
- Various Development Utilities :
- bbfy generates the C++ code of a black box from a
description file written in xml.
- bbCreatePackage allows to create the basic file architecture.
to start the development of a new black box package.
- bbCreateBlackBox allows to create the basic file architecture.
to start the development of a new black box, that will be included in an already existing package.
- bbs 2cpp translates a .bbs script into a C++ file.
- bbc (sorry : Linux Only, for the moment) that compiles .bbs scripts into executables.
- bbRegeneratePackageDoc which creates the html documentation of the Package.
- bbRegenerateBoxesLists which creates the html pages of the various lists of all the currenly installed boxes.
- bbPlugPackage which automatically incorporates a new package.
- A full documentation printable (pdf), browsable (html),
queryable throught keywords.
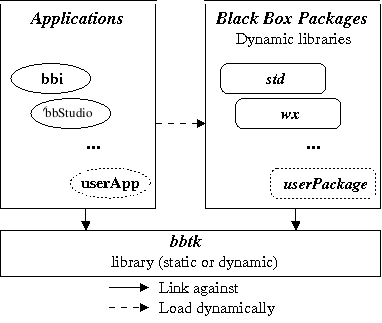
The general architecture of The Black Box Toolkit
is shown in figure .
Figure 1:
The Black Box Toolkit architecture
1.2 Content of this guide
2 Getting started with bbStudio
2.1 The interface
Just run it, typing in a console bbStudio
or clicking on its icon or its menu entry.
You'll get something like in figure
(the exact appearance of bbStudio is Operating System and bbtk version dependent).
At start, bbStudio opens with a very minimal 'How to use' in the middle.
Don't forget to read it : it will vanish at the first mouse click.
Figure 2:
The bbStudio Development environment interface at start time
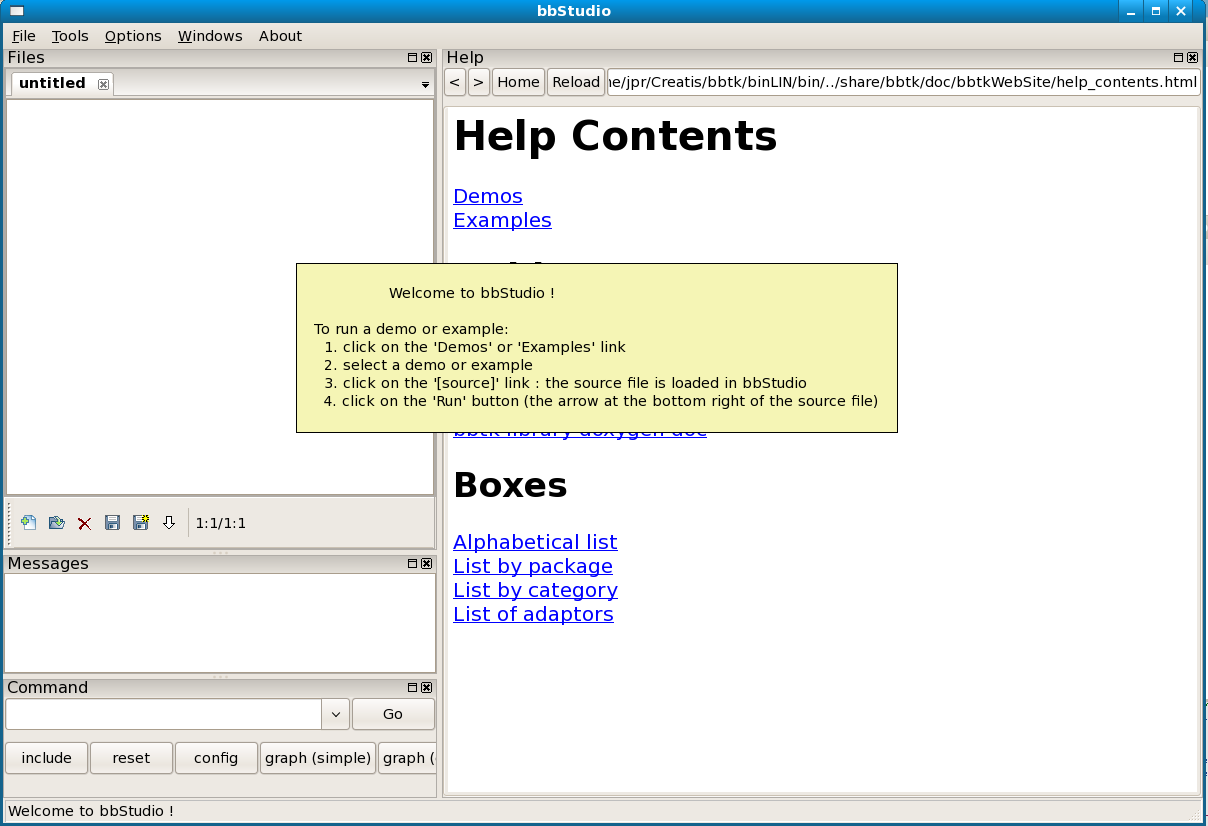 The interface is divided into four parts : Files, Messages,
Command, Help.
It is written using the Advanced User Interface library of wxWidgets
(a.k.a. AUI),
whose 'docking manager' allows windows and toolbars to be floated/docked
onto a frame.
Feel free to resize/reposition any part you want.
Your preferences will be kept next time you run again bbStudio.
The interface is divided into four parts : Files, Messages,
Command, Help.
It is written using the Advanced User Interface library of wxWidgets
(a.k.a. AUI),
whose 'docking manager' allows windows and toolbars to be floated/docked
onto a frame.
Feel free to resize/reposition any part you want.
Your preferences will be kept next time you run again bbStudio.
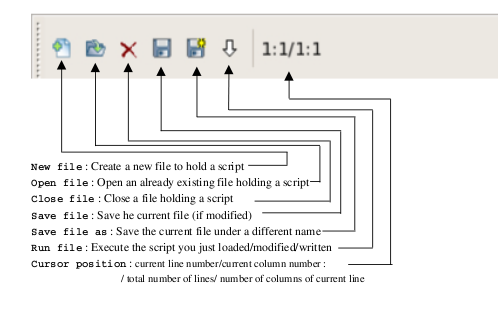
2.1.1 'Files' part
It's the bbs script editor.
If you load a file holding a script, it will be displayed here, and you'll be
able to modify it, to save it, to save-as it, to run it, using the
lower toolbar (see figure )
Figure 3:
The 'Files' lower tool bar
2.1.2 'Messages' part
Two kinds of messages will be output here:
System messages : produced by the kernel, in case of a user mistyping, or an execution error
Script messages : produced by the bbtk equivalent of printf
or std::cout in user programs.
2.1.3 'Command' part
You can type here bbs commands which are executed on the fly.
The buttons are shortcuts to usual commands.
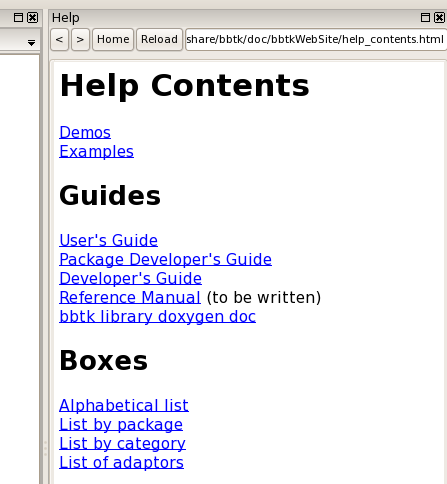
2.1.4 'Help' part
The 'Help' part of bbStudio is used to browse the html help of The Black Box Toolkit.
2.2 Running Demos and Examples
In the 'Help' part (See figure ), select Examples link.
Figure 4:
bbStudio 'Help' panel
 You will get a list of examples (See figure ).
Note : due to an unfixed bug in Linux, you have to click on 'reload' to get it.
You will get a list of examples (See figure ).
Note : due to an unfixed bug in Linux, you have to click on 'reload' to get it.
Figure 5:
Examples list
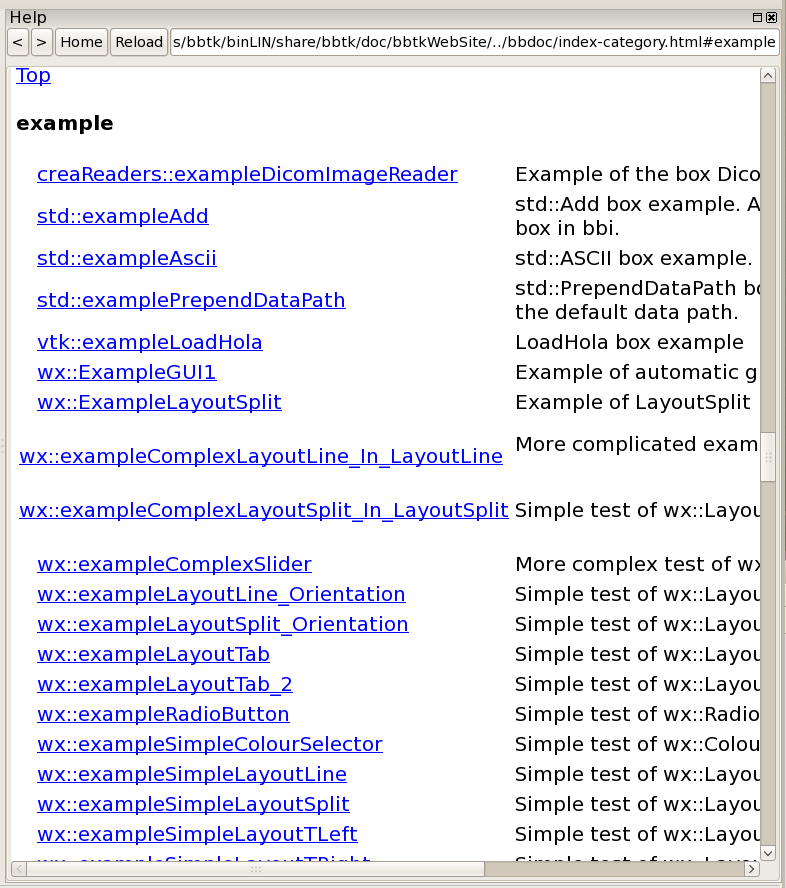 Select wx::exampleSlider.
Figure 6:
Html documentation of example 'exampleSlider'
Select wx::exampleSlider.
Figure 6:
Html documentation of example 'exampleSlider'
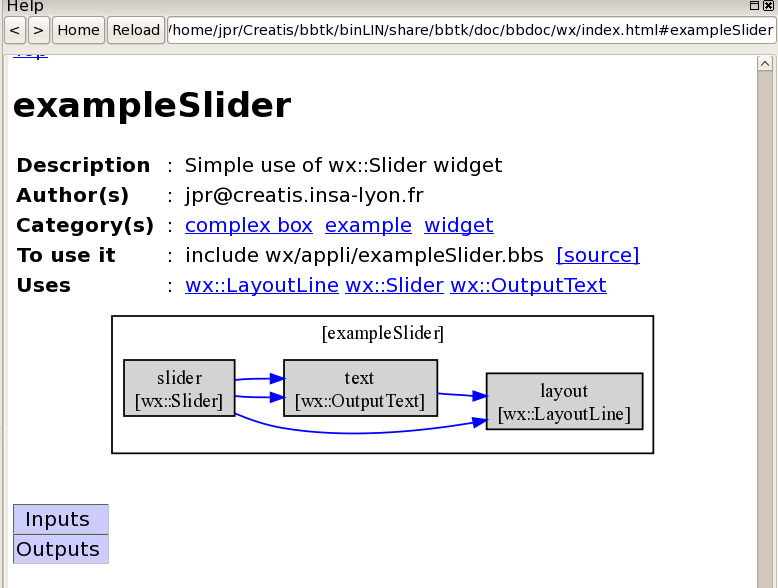 You can see information on the example and
the graphical representation of the workflow defined by the script
(the elementary boxes that compose it, and their connections, see figure 6).
Click on [source], it will be loaded
in the 'Files' part, within the script editor (See figure );
Figure 7:
Source code of 'exampleSlider'
You can see information on the example and
the graphical representation of the workflow defined by the script
(the elementary boxes that compose it, and their connections, see figure 6).
Click on [source], it will be loaded
in the 'Files' part, within the script editor (See figure );
Figure 7:
Source code of 'exampleSlider'
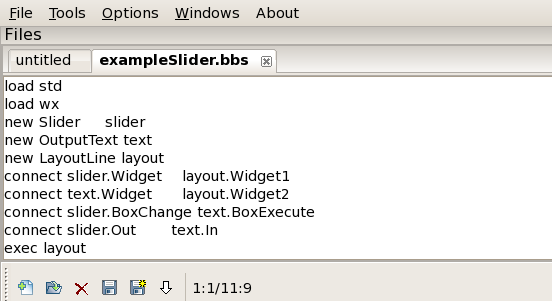 Run it, using the 'Files' toolbar (see figure 3)
You'll get something like in figure .
Figure 8:
Execution of 'exampleSlider'
Run it, using the 'Files' toolbar (see figure 3)
You'll get something like in figure .
Figure 8:
Execution of 'exampleSlider'
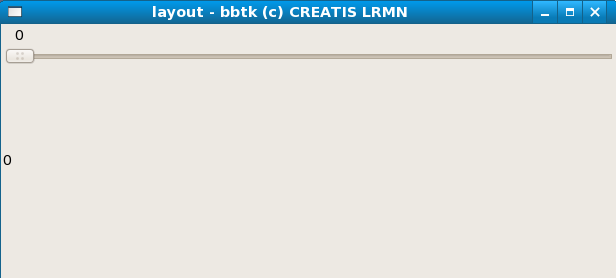 Feel free to move the slider, to check it actually works...
Just a few words on what you saw :
Feel free to move the slider, to check it actually works...
Just a few words on what you saw :
- In the source code of the script :
   load std
   load wx
These bbs commands load the packages std and wx
   new Slider     slider
   set slider.ReactiveOnTrack 1
We create a Slider box called slider.
We tell it to inform anybody that's interested in, that the cursor moved, each time it moved.
The default behaviour is to inform only when cursor is released.
new OutputText text
We create an OutputText box called text
(in which slider value will be displayed)
new LayoutLine layout
We create a LayoutLine box called layout,
a widget box designed to embed other widgets (say, a main window)
   connect slider.Widget    layout.Widget1
   connect text.Widget      layout.Widget2
We embed slider and text into layout.
   connect slider.BoxChange text.BoxExecute
   connect slider.Out       text.In
We tell slider to inform text every time it's modified.
We tell slider to pass its output value (Out)
to text input value (In)
exec layout
We tell layout to process itself.
This also produces the execution of the boxes connected to it (the slider, the text).
- In the Help part
You can see the graphical representation of the workflow (pipeline) created by the script,
as in figure .
Figure 9:
Graphical representation of a pipeline
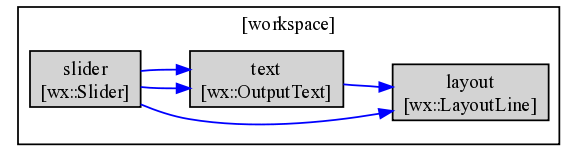 The representation includes
both the graphical interface-related pipeline
(slider and text are embedded into layout)
and the data processing-related pipeline
(slider warns text immediately when it's modified,
slider passes text its output value)1.
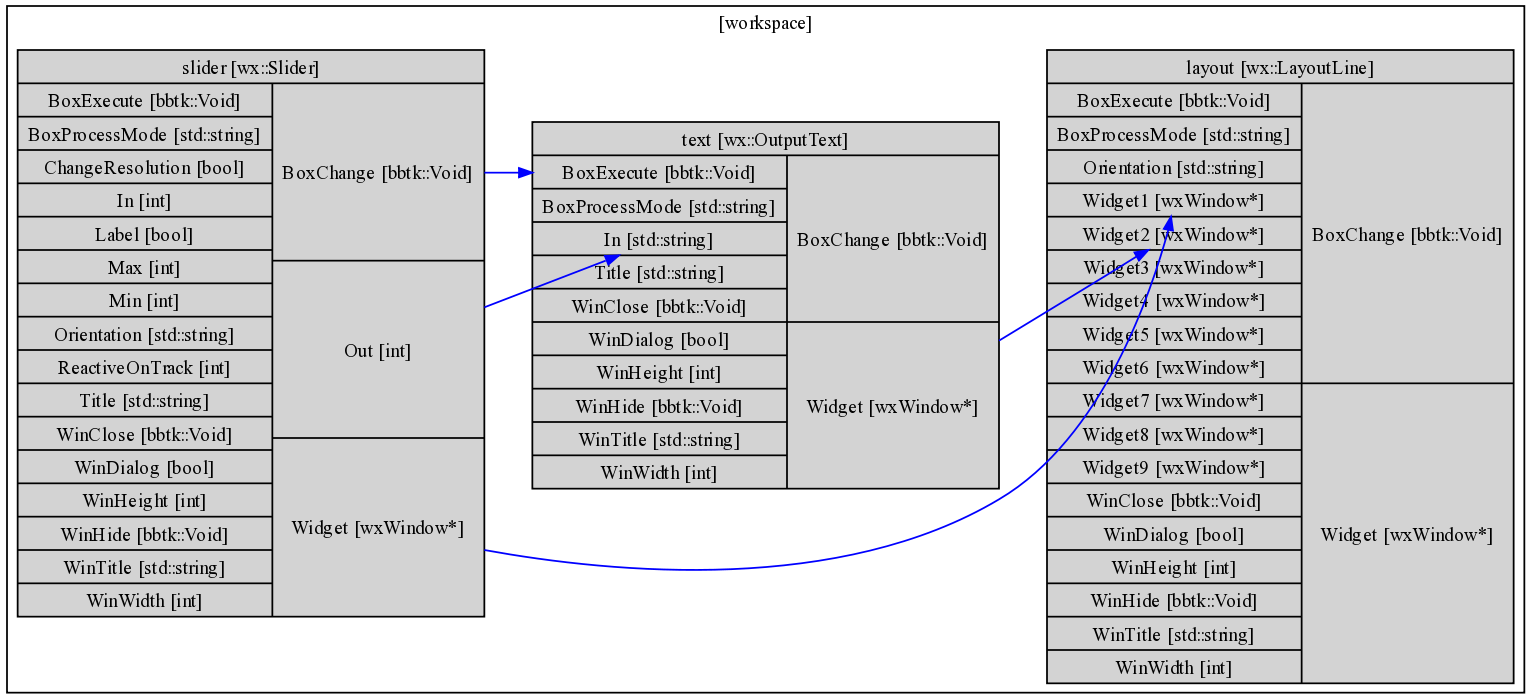
You can get a much more detailled graph,
like in figure ,
just clicking on the button
'graph (detailled)' in the toolbar of the Command part.
Figure 10:
Detailled graphical representation of a pipeline
The representation includes
both the graphical interface-related pipeline
(slider and text are embedded into layout)
and the data processing-related pipeline
(slider warns text immediately when it's modified,
slider passes text its output value)1.
You can get a much more detailled graph,
like in figure ,
just clicking on the button
'graph (detailled)' in the toolbar of the Command part.
Figure 10:
Detailled graphical representation of a pipeline
2.3 Online Help
Various levels or help are suplied by bbStudio.
2.3.1 Command line help
The 'working' area (the left one, as opposed to the 'help' area, on the right side) is composed of :
one single line area (Command), at the bottom, in which you can enter your commands and
a multiple line zone in which the Command interpreter prints out the result of your commands.
Command line help for the black box scripting language (bbs) can be obtained
in this zone (see ).
An html version of all the guides is browsable in the Help part of bbStudio.
- User's Guide : This guide !
- Package Developper's Guide : Step to step How-to for programmer who wants to create his own
black boxes/packages.
- Doxygen Documentation : Doxygen source browser.
Automatically generated from source files. Should only concern the kernel developpers.
2.3.3 Boxes Help
Lists of currently available boxes from installed packages
- Alphabetical list :
- List by package Boxes indexed by package
- List by category :
Each box is indexed by a list of keywords, called 'categories', such as 'read/write',
'filter' 'viewer', ...
A given box may belong to more than one category, however some categories are mutually exclusive.
Standard categories are :
- atomic box/complex box
Whether it's a 'atomic' unit written is C++ and available in binary form in a package or it's an assembly of several black boxes (atomic or complex) which is described in bbs script language.
Any box is either atomic ou complex.
Any pipeline described in a bbs script is itself viewed as a complex black box hence is tagged as belonging to this category.
- example / demo / application
These ones are scripts which produce a result when executed (i.e. they execute a pipeline like exampleSlider above), contrarily to the scripts which only define complex boxes but do not instanciate and execute boxes.
- example : It's just a (simple) example, for programmers, on how to use a given feature. The Examples link on the starting page links to the list of the boxes of this category.
- demo : It can be a 'good looking' (a.k.a 'sexy') example on some sophisticated work, done only by using bbtk. The Demos link on the starting page links to the list of the boxes of this category.
- application : It's a final application, end user intended (e.g. Subscale a huge volume witout loading it in memory, Crop a DICOM image, etc.)
- widget : A piece of graphical interface (based on wxWidgets)
- dicom : Dicom medical image-related box.
- viewer : A box allowing to view something (e.g. an image).
- read/write : An I/O-related box
- mesh : A mesh-related box
- filter : A filter, mainly image filters.
- image : An image-related box
- 3D object creator : A box which creates a 3D object to be injected into a 3D view (e.g. a plane, a surface).
- math : Math
- misc : Miscellaneous...
Remark that the list of categories is 'auto-extensible' : each time a new box is created which belongs to a new category and the boxes list is regenerated, then the new category appears in the list, holding the new box. The above list only contains the categories used in the packages provided with current bbtk release.
- List of adaptors : The adaptors are a special type of black box which are used internaly to perform type conversions. Thought there are not end user intended, you may see their list. Adaptors belong to the adaptor category.
2.3.4 The Package Browser
The package browser is a standalone application which
dynamically loads and queries the available packages.
It is thus a smarter tool than the static html documentation.
You can run it with the command bbPackageBrowser
or in bbStudio using either the button of the 'Command' part
or the menu entry 'Windows > Start Package Browser'.
Remark that it may take some time to start because it loads all available
packages at start.
Its appearance is reproduced in figure .
Figure 11:
The Package Browser
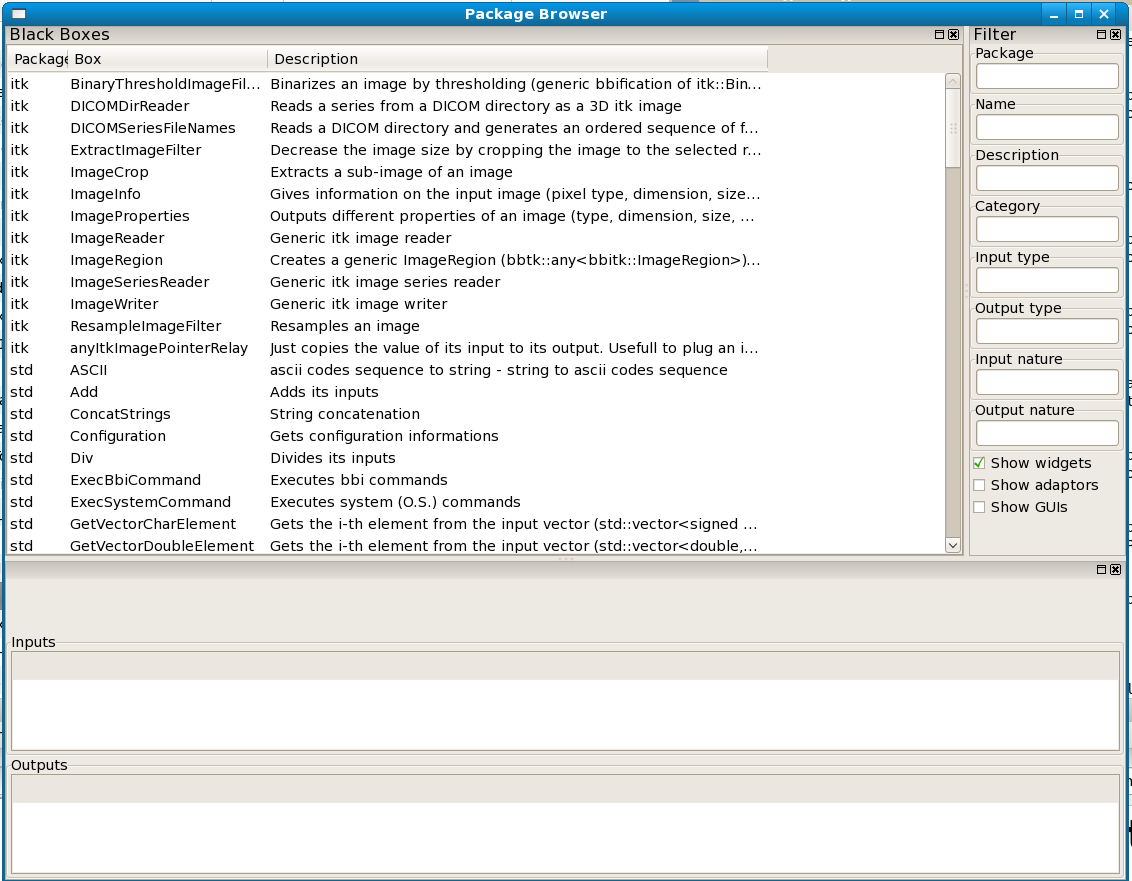 It allows you to find boxes using a multi-criteria filtering principle :
The boxes listed are the one whose attributes match all the
words entered in the 'Filter' part.
You can get the whole description of a given box clicking on its name.
Warnings :
It allows you to find boxes using a multi-criteria filtering principle :
The boxes listed are the one whose attributes match all the
words entered in the 'Filter' part.
You can get the whole description of a given box clicking on its name.
Warnings :
- It's case sensitive, i.e 'Button'
will give different results than 'button'
- You have to press enter in the filter zone to update the boxes list
- A filtering string only has to match a subpart of the related attribute of a box.
For example, entering 'utt' in the 'Name' attribute will match a box called 'Button'.
Attributes :
- Package : The name of the package to which the box belongs (e.g. wxvtk, std)
- Name : The name of a box or an application (e.g. Reader, example)
- Description : A part of the description of a box (e.g. 3D, image)
- Category : The categories of the box (e.g. demo)
- Input/Output Type : The C++ type of an input or output (e.g. int, vtkImageData*, std::string)
- Input/Output Nature : The nature of an input or output (e.g. file name, signal)
2.4 The Menu
At last, let's have a look at bbStudio menu.(See figure )
Figure 12:
The bbStudio menu

- File
- Open the bbtk configuration file
- Quit
- Tools
- Create package :
Provides a graphical interface to help package developpers to create a new empty package.
- Create black box
Provides a graphical interface to help package developpers to create a new empty black box, and add it to an already existing package.
- Plug Package
Incorporates a package into the list of known packages. Updates the html documentation.
- Regenerate package doc :
If a package has changed (e.g. new boxes) this updates the package html documentation.
- Regenerate boxes list :
Updates the boxes lists (alphabetical, by package, ...)
- Regenerate all
Regenerates all the packages documentations and the boxes lists (may be long...).
- Show last graph
Shows the last pipeline graph that was generated
- Options
- Reset before running Before running a script, all the already created boxes are destroyed,
all the already loaded packages are unloaded (this is the recomended option).
- Windows
User may decide, for any reason of his own, to hide one or more panels:
- Show 'Files' panel
- Show 'Help' panel
- Show 'Command' panel
- Show 'Messages' panel
- Start Package browser : starts the package browser (see 2.3.4).
- About
- About : Info about bbStudio.
3 Writing black box scripts (bbs)
This section introduces how to write down black box scripts (bbs)
to create and execute pipelines.
3.1 The commands
In bbStudio , try typing in the Command area (in what follows,
the commands entered by the user will be preceded by a prompt ) :
> help
you get the list of the commands of the interpreter :
Available commands :
 author
 category
 config
 connect
 debug
 define
 delete
 description
 endefine
 endpackage
 exec
 graph
 help
 include
 index
 input
 kind
 load
 message
 new
 newgui
 output
 package
 print
 quit
 reset
 set
 unload
To get help on a particular command type help <command-name>,
for example:
> help author
gives :
 usage : author <string>
  Adds the string <string> to the author information of the black box being defined
The help command has multiple usages.
It is used to get help about almost anything in the interpreter!
Type 'help help' to get help on the help command itself :
> help help
 usage :
         (1) help
         (2) help <command name>
         (3) help packages [all]
         (4) help <package name> [all]
         (5) help <black box type>
         (6) help <black box name>
  Effect :
         (1) Lists all available commands;
         (2) Prints help on a particular command;
         (3) Lists the packages loaded and their black boxes.
             Add 'all' to list adaptors;
         (4) Prints short help on the black boxes of a package.
             Add 'all' to include adaptors;
         (5) Prints full help on a black box type;
         (6) Prints information on the inputs, outputs and connectionns
	     of a black box instance.
3.2 Creating and executing black boxes
At start the interpreter does not know any black box.
If you type 'help packages', which is
the third form of the help command, you get :
> help packages
user
  workspace
which means that the interpretor only knows one package
(library of black boxes) called user
and which contains a black box called workspace.
The user package is an internal package of the interpreter,
which stores user-defined black box types.
At start, it already contains
one box, called workspace.
workspace is a special type of black box,
called complex black box, whose purpose is
to store other black boxes.
Any black box you create in bbStudio is stored
in workspace
(this will be explained in details in sections
and
).
If you type 'help workspace', you get :
> help workspace
 Complex Black Box <user::workspace>
  User's workspace
  By : bbtk
  Category(s) : complex box;
  * No inputs
  * No outputs
  * No boxes
In the text displayed,
the user:: prepended to the name workspace
means that the box workspace
belongs to the user package.
Then comes a description and three lines which
tell that workspace does not have any input
nor output nor boxes yet.
In order to let the interpreter know of some black boxes,
you must load another package.
The std package is the "standard" package,
which contains basic useful black boxes.
To load it, type :
> include std
Then if you type :
> help packages
you get something like :
 std
   ASCII                   : ascii codes sequence to string - string to ascii...
   Add                     : Adds its inputs
   ConcatStrings           : String concatenation
   Configuration           : Gets configuration informations
   Div                     : Divides its inputs
   ExecBbiCommand          : Executes bbi commands
   ExecSystemCommand       : Executes system (O.S.) commands
   GetVectorCharElement    : Gets the i-th element from the input vector (std...
     ...
   MagicBox                : Takes *any kind* of data and copies it to its ou...
   MakeFileName            : Makes a kosher file name
   Mul                     : Multiplies its inputs
   MultipleInputs          : This box has multiple Void inputs and one Void o...
   StringRelay             : Just copies the value of its input to its output...
   StringSelect            : Outputs the string set to the ith input Ini (In0...
 user
   workspace
Now the interpreter knows the package std and the black boxes it provides,
such as the Add box, the ConcatStrings box, and so on. Remark that the
content of std may vary from one version to another
as new black boxes might be added to it.
If you type :
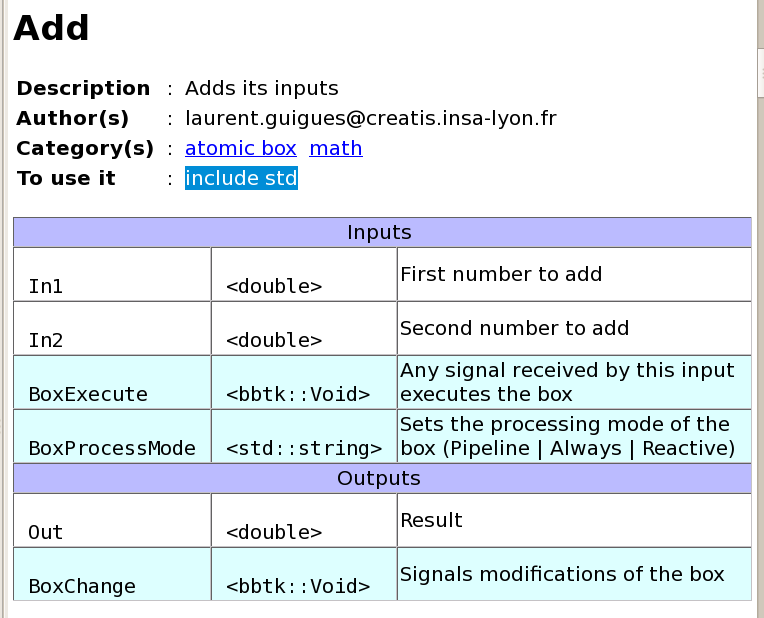
> help Add
You'll get a text help, in the 'Message' part :
Black Box <std::Add>
  Adds its inputs
  By : laurent.guigues@creatis.insa-lyon.fr
  Categories : atomic box;math;
  * Inputs :
     'BoxExecute'     <bbtk::Void> [signal] : Any signal received by this input
                                              executes the box
     'BoxProcessMode' <String>     []       : Sets the processing mode of the box
                                              (Pipeline | Always | Reactive)
     'In1'            <Double>     []       : First number to add
     'In2'            <Double>     []       : Second number to add
  * Outputs :
     'BoxChange'      <bbtk::VoidS> [signal] : Signals modifications of the box
     'Out'            <Double>     []       : Result
After loading the package it belongs to, you can create an instance of an Add box by
the command new :
> new Add a
The 'a' at the end is the name of the instance,
which will be used to reference it later.
It is important to distinguish a box type
and an instance of a box type.
The Add box of the package std is actually
a box type , like int is a data type
in C langage. The new command allows to create
an instance of a box type, exactly like int i; in
a C code declares a variable of type int whose
name is i.
Of course, like in C Language, you can declare multiple boxes of the
same type in bbi .
After the creation of the box a, type :
> help workspace
you get :
Complex Black Box <user::workspace>
 User's workspace
 By : bbtk
 Category(s) : complex box;
 * No inputs
 * No outputs
 * Boxes :
    'a' <std::Add>
which means that bbi workspace now contains a black box named a,
of type std::Add.
Type
Help Add
and have a look to the 'Help' Part (see figure : )
Figure 13:
The html Help
 You can see a description
(the one which was provided by the author of the box),
the author(s) of the box (usually e-mail adress(es)) and
the categories to which the box belongs.
Finally comes the lists of inputs and outputs of the box.
For each input or output, bbi provides
its name ,
its type (between < and >, e.g. <Int>)
and a description.
Remark that the box Add is not a 'complex' black box
but an 'atomic' box, hence its help does not
include a pipeline graph.
You can see that Add boxes have two inputs,
with name In1 and In2,
and an output, with name Out.
You can set the input In1
of the Add box a to the value 1
by the command :
You can see a description
(the one which was provided by the author of the box),
the author(s) of the box (usually e-mail adress(es)) and
the categories to which the box belongs.
Finally comes the lists of inputs and outputs of the box.
For each input or output, bbi provides
its name ,
its type (between < and >, e.g. <Int>)
and a description.
Remark that the box Add is not a 'complex' black box
but an 'atomic' box, hence its help does not
include a pipeline graph.
You can see that Add boxes have two inputs,
with name In1 and In2,
and an output, with name Out.
You can set the input In1
of the Add box a to the value 1
by the command :
> set a.In1 1
Similarly, setting the input In2 of a to the value 2
is done with :
> set a.In2 2
And you print the output Out of the box a with :
> print "result=$a.Out$"
result=3
In the string passed to the print command,
each substring enclosed between a couple of $ is considered
as the name of an output of a box.
To process this special substrings, the interpretor :
- Processes the box if needed (see below)
- Converts the output of the box to a string if possible
(see below)
- Substitutes the result in the string to print
- Postpones an implicit 'new line' character to the string
Box processing is needed if :
- either at least input has changed since last processing
- or the input 'BoxProcessMode' of the box is set to
'Always', which forces box reprocessing.
Note that all boxes have an input named 'BoxProcessMode'.
Another way to process the box a is to issue the command :
> exec a
however this command does not display anything (except if the
box itself displays something in its processing).
It just processes the box if needed.
This command is used to execute boxes that do not have any output,
such as boxes that write something to a file or, display a
graphical interface, and so on.
Summary
- The include command allows to load a package, and the complex black boxes that come with it..
- help gives help on :
- Available commands if you just type help.
- A particular command if you type help <command-name>.
- All available packages and their boxes (without description) if you type help packages.
- A particular package and its boxes (with brief description) if you type help <package-name>.
- A particular black box type (with full description) if you type help <box-type-name>. In particular, help workspace displays information on the content of the 'workspace' black box, which stores the boxes created by the user (by new).
- new : creates an instance of a black box.
- set : sets the value of an input of a black box.
- Under any component of bbStudio, to reference the input called i
of a black box called b you must type 'b.i'.
The same syntax holds for outputs.
- print : prints a string, substituting each substring of the form $b.o$ by the value of the output o of the black box b. Note that an
implicit trailing 'new line character' is added at the final string.
- exec : runs, if needed, the process of a box.
3.3 Connecting black boxes
The Black Box Toolkit allows to create
and execute processing chains,
also called pipelines,
by connecting black boxes.
This section explains how to do it with examples.
Read section to get
more information on pipeline processing.
First start bbStudio and load the package std, typing :
> include std
in the 'Command' part.
Assume you want to compute 1+2+3. You can do it by
chaining two Add boxes, as shown in figure
.
Figure 14:
A simple pipeline which adds 3 numbers
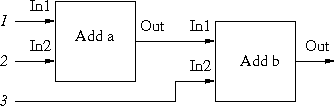 The bbi instructions to create and execute this pipeline are :
> new Add a
> new Add b
> connect a.Out b.In1
> set a.In1 1
> set a.In2 2
> set b.In2 3
> print $b.Out$
You will see the (very expected) result :
6
The first three commands build the pipeline,
the next three set a and b black boxes inputs and the last one
prints b black box output (the pipeline is executed before printing, because the interpretor 'knows' the box b,
whose output is requested, is not up to date).
The command 'connect a.Out b.In1' "plugs" the output
Out of the box a into the input In1 of the
box b.
Once the boxes are connected, the processing of the two boxes are chained :
getting the output of b requires getting its inputs,
hence getting the output of a which is connected to it.
This pipeline mechanism can recurse into arbitrary long
chains of boxes (see
for details).
Lets' consider an other, more image oriented, example :
> include vtk
> include wx
> include itk
> include wxvtk

> new FileSelector fileDialog
> new ImageReader  reader
> new Slider       slider
> new Viewer2D     viewer

> connect fileDialog.Out   reader.In
> connect reader.Out       viewer.In
> connect slider.Out       viewer.Slice
> connect slider.BoxChange viewer.BoxExecute

> exec viewer
Some explainations : the include instructions load the necessary packages.
FileSelector will pop a File Selector, at run time, that will out the user chosen file name.
Slider will pop a Slider, at run time, that will out an integer, used later as a slice number.
ImageReader will read any itk readable file, whose name is passed as a std::string, and return a pointer on an itk image.
Viewer2D displays a plane, whose number is specified by an integer.
connect fileDialog.Out reader.In plugs the output of the File Selector (a std::string) to the input of the reader (a std::string, too).
connect reader.Out viewer.In plugs the output of the reader (an bbtk::any<bbitk::ImagePointer> which is a type defined by the
itk package which can hold any itk image pointer) to the input of the Viewer (a vtkImageData *)
connect slider.Out viewer.Slice plugs the output of the slider (an int) to an other output (named Slide) of the viewer.
connect slider.BoxChange viewer.BoxExecute says the viewer that it must re process itself any time the slider is modified.
exec viewer processes the viewer.
This would correspond to the graph in figure
Figure 15:
(Very) simple Graph of a (very) simple pipeline
 Of course, to be able to connect two boxes,
the output and the input must be compatibles.
You can always connect an output to an input of the same type,
but you can do more, thanks to particular (hidden) black boxes called adaptors.
An adaptor is a black box which has at least one input, called In,
and at least one ouput called Out and whose role is to convert
a data of the type of In
into a data of the type of Out (other inputs or outputs may serve
to parameter the adaptor or retreive other useful information).
Under bbStudio, if you type :
Of course, to be able to connect two boxes,
the output and the input must be compatibles.
You can always connect an output to an input of the same type,
but you can do more, thanks to particular (hidden) black boxes called adaptors.
An adaptor is a black box which has at least one input, called In,
and at least one ouput called Out and whose role is to convert
a data of the type of In
into a data of the type of Out (other inputs or outputs may serve
to parameter the adaptor or retreive other useful information).
Under bbStudio, if you type :
> load std
> help std all
you get :
 Package std v1.0.0 - laurent.guigues@creatis.insa-lyon.fr
 Basic useful black boxes
 Black boxes :
      ...
   BoolToString        [DA]  : Converts a Bool (bool) into a string
   CastBoolToChar      [DA]  : Static cast from Bool (bool) to Char (signed c...
   CastBoolToDouble    [DA]  : Static cast from Bool (bool) to Double (double...
      ...
   CastBoolToUChar     [DA]  : Static cast from Bool (bool) to UChar (unsigne...
   CastBoolToUInt      [DA]  : Static cast from Bool (bool) to UInt (unsigned...
      ...
   CastUIntToBool      [DA]  : Static cast from UInt (unsigned int) to Bool (...
   CastUIntToChar      [DA]  : Static cast from UInt (unsigned int) to Char (...
   CastUIntToDouble    [DA]  : Static cast from UInt (unsigned int) to Double...
      ...
[DA] stands for default adaptor.
Once you have loaded the package std, you can
plug an output of type char into an input of type double.
When the interpreter encounters the connect command,
it looks for an adequate adaptor in the loaded packages.
In our case, as the package std provides the
CastUCharToDouble adaptor, the interpreter automatically creates an
instance of this adaptor and place it between
the output and the input you want to connect
(however this adaptor is hidden to you,
it is embedded into the created connection and does not appear
as an existing black box).
When the pipeline is processed the
adaptor converts the output data into the required input type,
in a totally transparent way.
In our example, the CastUCharToDouble adaptor
would simply cast the value of the char into a double,
however arbitrarily complex type conversion may be done.
WARNING : these adaptors are C++ static cast, i.e., there is, right now,
no 'intelligent' conversion (only truncation) e.g. think to CastDoubleToUChar!
Note that the set and print commands of interpreter
work with adaptors from string to the type of the input to set
or from the type of the output to print to string.
Hence in order to set or print values the adequate
adaptors must be available in the packages currently loaded.
Summary
- The connect command allows to connect two black boxes
- You can connect two black boxes if (and only if) :
- The output and the input are of the same type, or
- There is an adaptor black box in the packages loaded which
converts data of the output type into data of the input type
- help <package name> does not display the adaptors of the package. To see them use : help <package name> all.
including adaptors
3.4 Creating complex black boxes
Remember the pipeline of figure
14, which
computed the sum of three doubles.
You can consider it as a whole and define
a new black box type, which will be a complex black box,
having three inputs and one output,
as shown in figure .
Figure 16:
Creating the complex black box Add3
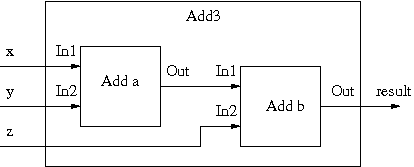 The bbi commands to define this complex black box are
the following :
The bbi commands to define this complex black box are
the following :
> load std
>
> define Add3
>
> new Add a
> new Add b
> connect a.Out b.In1
>
> author "myself"
> description "adds 3 doubles"
> input x a.In1 "first double to add"
> input y a.In2 "second double to add"
> input z b.In2 "third double to add"
> output result b.Out "output"
>
> endefine
Explainations :
As we will use Add boxes, we need to load the package std, which is done in first line.
The command define then starts the definition
of the complex box type, which will be called Add3.
The next three lines define the pipeline,
exactly in the same way than outside a complex box definition.
The commands author, description, input
and output are commands specific to complex boxes definition :
author and description are used for the documentation
of the new box. You can provide multiple author or
description commands, the arguments of the commands will
be concatenated to produce the final author and description strings.
input and output are used to define the inputs and outputs
of the new complex box.
Their syntax is the same : for each new input/output you need to say
to which internal input/output it corresponds and to provide
a help string documenting the input/output.
In our example, we define that the box Add3 has
three inputs : x, y and z.
The input x corresponds to the input In1 of the
internal box a.
In the same way, the external input y
corresponds to the internal input a.In2, and
the external input In3 to b.In2.
The only output of the new box is called result
and corresponds to b.Out.
The figure 16
illustrates the external to internal
input/output correspondence.
Finally, the endefine command ends the definition of the
new box type.
After this definition, if you ask for help
on packages, you get :
> help packages
std
  Add
  ...
user
  Add3
  workspace
The user package now contains a new black box type, called
Add3. If you ask for help on this type of box, you get :
> help Add3
Complex Black Box <user::Add3>
 adds 3 doubles
 By : myself
 * Inputs :
    'x'      <double> : first double to add
    'y'      <double> : second double to add
    'z'      <double> : third double to add
 * Outputs :
    'result' <double> : output
 * Boxes :
    'a' <std::Add>
    'b' <std::Add>
and you can use it like any other box, for example type :
> new Add3 a
> set a.x 1
> set a.y 2
> set a.z 3
> print $a.result$
6
As a side note, we can say that, for consistency reasons, it would have been better to name
In1, In2 and In3 the inputs of the black box Add3,
since all the 'natural entry' of a box is named In, or Inx if there are more than one 'natural
entry'
.
Summary
- The define/endefine commands allows to define complex black box types, i.e. types of black boxes made up of other black boxes.
Inside a define/endefine block :
- The author and description commands allow to document the new type of box
- The input and output commands allow to define the inputs and outputs of the new type of box, that is to which inputs and outputs
of internal boxes they correspond.
3.5 Writing scripts files
Once you have defined a new type of complex box, you
may like to reuse it. To do this, you can simply
write the bbs commands defining the new box
into a text file and afterwards include that file in bbi.
Doing this, you start writing bbs scripts.
The conventional (and mandatory) extension for such scripts is bbs
(black box script).
For consistency reasons, you are requested to prepend bb to the name.
For example, the Add3 complex box we previously worked on
can be defined in the bbAdd3.bbs file :
File bbAdd3.bbs
# Defines the Add3 black box which adds 3 doubles
load std

define Add3
  # I am the author
  author "myself"
  description "adds 3 doubles"
  # Pipeline creation
  new Add a
  new Add b
  connect a.Out b.In1
  # Inputs definition
  input x a.In1 "first double to add
  input y a.In2 "second double to add
  input z b.In2 "third double to add"
  # Output definition
  output result b.Out "output"
endefine
End of file
Lines starting with a # character or a / / character are ignored, they
are considered as comments by the interpreter.
To use this file in bbStudio, click on the include button, and browse your filestore to find the file.
> include bbAdd3.bbs
> help Add3
Complex Black Box <user::Add3>
 adds 3 doubles
 By : myself
 * Inputs :
    'x'      <double> : first double to add
    'y'      <double> : second double to add
    'z'      <double> : third double to add
 * Outputs :
    'result' <double> : output
 * Boxes :
    'a' <std::Add>
    'b' <std::Add>
>
and so on ...
If the file has the bbs extension, you can ommit it and just type :
> include Add3
3.6 Creating complex black boxes that use complex black boxes
Of course, you can include script files in other script files,
like in the following example :
File bbAdd4.bbs
# Defines the Add4 black box which adds 4 doubles
include Add3

define Add4
  author "myself"
  description "adds 4 doubles"
  new Add3 a
  new Add b
  connect a.Out b.In1
  input In1 a.In1 "first double to add
  input In2 a.In2 "second double to add
  input In3 a.In3 "third double to add"
  input In4 b.In2 "fourth double to add"
  output Out b.Out "output"
endefine
End of file
The inner boxes have they own entries (In1, In2, In3 for box a, In1, In2 for box b )
Only the inputs In1, In2, In3 of box a and the input In2 of box b is of interest for the end user, but he dosn't want to have to
care neither about the inner boxes name, nor about the names of their Inputs.
The writer of the complex box has the ability to give these inputs a meaningfull name !
  input In3 a.In3 "third double to add"
  input In4 b.In2 "fourth double to add"
3.7 Naming Conventions
- File names :
For consistency reasons, you are requested to prepend bb, and postpone an extention .bbs,
to the names of the files that hold a complex black box definition.
For example, the Add3 complex box we previously worked on
can be defined in the bbAdd3.bbs file.
-
Search Paths :
For consistency reasons, the names of dynamic libraries holding the packages start by bb.
For instance, the package wx will be in the library bbwx.dll (Windows) or libbbwx.so
(Linux).
Summary
- The include command tells the interpreter to include a script file.
- Lines starting with a # or with a / / are considered as comments by the interpreter.
- Lines between a line starting with a /* an a line ending with a * / are considered as comments by the interpreter.
3.8 Creating command line applications
Now that you know how to create complex black boxes
(with define/endefine), think
back to the workspace object.
Remember that it is also
a complex black box.
Actually, when you type interpreter commands
outside a define/endefine block,
you progressively define the workspace
complex black box.
You can think of it like if at start the interpreter
was issuing a command 'define workspace'
and then letting you define the interior of the box
workspace.
Remember that the command inputs
allows to define an input of a complex box.
Now, if you use the command input
outside a define/endefine block then
it defines an input of the workspace box,
that is an input of the main program.
This input will then be connected to the
parameters that the user passes to the command line.
For example, consider the script :
File add.bbs
load std
new Add a
input x a.In1 "first number to add"
input y a.In2 "second number to add"
print "x+y=$a.Out$"
End of file
The third and fourth lines define two inputs x
and y. When you execute this script,
you can pass these two arguments on the command line,
like this :
> bbi add x=1 y=1
x+y=2
You can also invoke bbi the option -h,
which gives help on the workspace box :
> bbi add -h
 User's workspace
 By : bbi (internal)
 * Inputs :
    'x' <double> : first number to add
    'y' <double> : second number to add
To get a better help, use the description
and author commands :
File add.bbs
description "Adds two numbers"
author "foo@bar.com"
load std
new Add a
input x a.In1 "first number to add"
input y a.In2 "second number to add"
print "x+y=$a.Out$"
End of file
Now if you ask for help on the add script, you get :
> bbi add -h
 Adds two numbers
 By : foo@bar.com
 * Inputs :
    'x' <double> : first number to add
    'y' <double> : second number to add
Rather than getting the inputs of a script
from the command line, you can ask bbi to
prompt the user for the values, using the -t
commutator :
> bbi add -t
x=[the program waits for user answer]2
y=[the program waits for user answer]5
x+y=7
You can also use the -g commutator.
bbi then prompts the user in graphical mode,
displaying a dialog box for each input,
like in fig. .
Figure 17:
Input dialog box
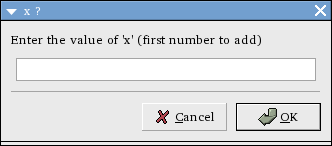 Note that for both -t and -g options,
the input from the user is a string and
bbi converts it to the right input type using
an adaptor, hence the right adaptors must be loaded.
Note that for both -t and -g options,
the input from the user is a string and
bbi converts it to the right input type using
an adaptor, hence the right adaptors must be loaded.
Summary
- The input, description and author commands,
when they are used outside a define/endefine block allow
to define the inputs, description and author of the main program.
- Inputs of the main program can be passed on the command line
using the syntax <input-name>=<value>.
No white space is allowed, if the value or the input name
contains white spaces, enclose them
between double quotes, e.g. "parameter with white spaces = gnu's not unix".
- The -h option of bbi prints help on the main program.
- The -t option of bbi orders the program to prompt for its inputs in text mode.
- The -g option of bbi orders the program to prompt for its inputs in graphical mode.
3.9 Using graphical interface boxes (widget boxes)
Basic graphical interface components are provided in the package wx,
such as buttons, sliders, file open/save dialogs, etc.
As first example, type the following commands in bbi :
> load wx
> new InputText t
> print $t.Out$\n
When you type enter after the last line,
a window pops up in which you can entrer a text.
When you close the window, the text you entered is printed by
the print command.
Type help wx, you get something like :
 Package wx v1.0.0- info-dev@creatis.insa-lyon.fr
 Basic graphical interface elements (sliders, buttons ...) based on wxWidgets
 Black boxes :
   ColourSelector        : Colour Selector dialog (bbfication of wxColourSele...
   ColourSelectorButton  : A button which displays a colour picker dialog whe...
   CommandButton         : Button which executes bbi commands
   DirectorySelector     : Pops up a directory selection dialog (wxDirDialog)
   FileSelector          : Pops up a file selection dialog for reading or sav...
   InputText             : A zone in which the user can enter a text (wxTextC...
   LayoutLine            : LayoutLine widget (wxBoxSizer)
   LayoutSplit           : Widget which splits a window in two fixed size par...
   LayoutTab             : LayoutTab widget (wxNotebook)
   OutputText            : Text zone to be inserted into a window (wxStaticTe...
   RadioButton           : RadioButton group widget 0-9 entries
   Slider                : Slider widget (wxSlider)
You can reproduce the same experiment as above using a
Slider or a FileDialog rather than a InputText..
There is a special kind of widget, called 'Layout', designed to
contain other widgets in order to build larger dialog boxes.
For example, the LayoutSplit widget is a container which
"splits" a window into two parts, either horizontally or vertically,
each part including another widget.
The initial size of the two parts can be fixed by the input 'Proportion'
and be adjusted by the user thanks to a "handle".
The example exampleLayoutSplit demonstrates its use.
Run it : it displays a window with two sliders.
Move the sliders and close the window.
Now look at the source file to see how this is done :
File scripts/test/testSplit.bbs
load wx

new Slider s1
new Slider s2

new LayoutSplit s
connect  s1.Widget s.Widget1
connect  s2.Widget s.Widget2

exec s
End of file
First, the two sliders s1 and s2 are created.
A LayoutSplit box s is also created.
The connect commands then "includes" the sliders in the
split widget.
The input Widget is common to all widget boxes :
every widget can be inserted into another widget.
The outputs Widget1,Widget2 are specific of layout
widgets
(in bbi type help Slider :
you will see the output Widget;
type help LayoutSplit :
you will see the inputs Widget1 and Widget2
and the output Widget).
When you connect the Widget output of a box
to the Widgeti input of a layout widget,
you order to include the widget in the layout.
Of course, the order of connection is important.
In our case, the slider s1 is included first,
then the slider s2 : s1 will be placed
on top of s2 (the LayoutSplit box is
implemented that way, but this is arbitrary choice).
Right now, there are only three layout widgets in the wx package :
- the LayoutSplit widget we just described
- the LayoutLine widget can have multiple children
(Widget1, Widget2,... Widget9 inputs) and
divides its window into as much parts as children,
each part of equal size.
The orientation of the LayoutSplit or of the LayoutLine can be changed by the input Orientation.
With only those two layout widgets you can already create
complex dialog boxes
(of course layouts can be nested, which leads to tree-like
structures of widgets).
See the script exampleComplexLayoutSplit_In_LayoutSplit for an example.
- The LayoutTab widget arranges its children
in different pages or 'tabs' (wxNotebook-based).
The label of each page is the name of the widget it contains.
3.10 Deeper in the boxes
3.10.1 Default and mandatory inputs and outputs
- Any atomic black box has two default Inputs, which are created by the system :
- BoxExecute : Any signal received by this input executes the box
- BoxProcessMode : Sets the processing mode of the box :
- Pipeline : The box executes itself only when an input was changed (normal pipeline processing).
- Reactive : Re-processes immediately when any input changes.
To be more selective, better use
'connect A.BoxChange B.BoxExecute'.
- Always : Usefull for 'sources', that must be processed, even when no input changed (e.g. : FileSelector, ColorSelector)
This one is not end user intended (for Package developer only)
- And one default output :
- BoxChange : Signals any modification of the box. This output may be connected if necessary to the BoxExecute
input of an other box : each time the boxes changes (e.g. a Slider is moved) the box it is connected to will be forced to update.
If you create complex boxes, it is a good idea to define those inputs and outputs to be able
to force the execution of your complex box or be aware of its changes...
- Any widget box has five Inputs, that will be dealt with only if the box is not connected to the Widgeti of any Layout box :
- WinHeight : Height of the window
- WinWidth : Width of the window
- WinTitle : Title of the window
- WinClose : Any received signal closes the window
- WinHide : Any received signal hides the window
- WinDialog : When set to 'true', creates a dialog window, that blocks the pipeline until it is closed (modal)
If you define a complex widget box, it is a good idea to define these inputs to be able
to customize your window settings.
- Any widget box has one mandatory Output :
- Widget : that is the wxWindow itself. If it's not connected to the Widgeti of any Layout box, then the box will create its own window (frame or dialog) on execution. If it's connected to the Widgeti of a Layout box,
it will be embedded in its parent window.
If you define a complex widget box, it is a good idea to use this standard name for your window output
- Any Layout box (i.e. LayoutLine, LayoutSplit or LayoutTab) has one or more mandatory Inputs :
- Widgeti : e.g. a LayoutSplit box (Widget which splits a window in two resizeable parts)
has two Input parameters Widget1 and Widget2, used to embed the child windows.
e.g. a LayoutLine divides the window in up to 9 (depending on the number of inputs Widgeti) fixed size parts.
If you define a complex layout box, it is a good idea to use these standard names for your
sub-windows inputs.
4 Using third party Package
4.1 Plugging in a Package
bbStudio makes it easy for you : in the menu Tools just click on the
option Plug Package. You will be asked to 'Select
package directory'. Browse untill you find the install or the build directory,
depending whether you installed the package or not.
bbStudio will update the configuration file, generate the 'Package
documentation', and update the 'Boxes Lists'.
You will be able to use the new package just as you did for any other bbtk
canonical Package.
4.2 Hard incorporating of a Package
If the Package you want to use is supplied in a non standard way (e.g. : you
where given one ore more dynamic libraries (.dll or .so), and/or
one or more directories containing bbtk scripts (.bbs)
you can edit your bbtk configuration and add the appropriate
paths, see .
4.3 Updating the documentation
You may add your own boxes (simple boxes, if you are aware enough in C++
language, or complex boxes if you are aware enough in bbtk scripting).
To update the html help of this package,
use the option Regenerate package doc
in the menu Tools of bbStudio.
You'll be prompted for the Package name.
Avoid using the -a option (Regenerate all), since it's time consumming.
To update html boxes lists with the new boxes,
use the option Regenerate Boxes Lists
in the menu Tools of bbStudio.
4.4 Using the package
The only thing you have to do is to include or load the package,
within a script, or from the Command part,
and enjoy the black boxes it contains.
5 Using black boxes in C++ programs
A very useful feature is that you may use any widget
black box within a C++ program
without worrying about writing a wxWidgets main application.
Let's look a the following bbs script :
# Load the packages
load std
load wx

# Create the Objects
new Slider     slider
new OutputText text
new LayoutLine layout

# Graphical pipeline
connect slider.Widget    layout.Widget1
connect text.Widget      layout.Widget2

# Execution pipeline
connect slider.BoxChange text.BoxExecute
connect slider.Out       text.In

# Go!
exec layout
User wants to create a slider and an output text, within a LayoutLine,
and display the slider value in the output text.
Think about the (little!) nightmare to code the same, in 'raw C++', using wxWidgets.
The following C++ code does the same :
#include <bbtkFactory.h>
#include <bbwxSlider.h>
#include <bbwxOutputText.h>
#include <bbwxLayoutLine.h>

int main(int argv, char* argc[])
{
  try
    {
      // we need to intanciate a bbtk::Factory to be aware of the adaptors
      bbtk::Factory::Pointer factory = bbtk::Factory::New();

      // Load the packages
      // ----------------
      factory->LoadPackage("std");
      factory->LoadPackage("wx");

      // Create the Objects
      // ------------------
      bbwx::Slider::Pointer     slider   = bbwx::Slider::New("slider");
      bbwx::OutputText::Pointer text     = bbwx::OutputText::New("text");
      bbwx::LayoutLine::Pointer layout   = bbwx::LayoutLine::New("layout");

      // Graphical pipeline
      bbtk::Connection::Pointer c1       = bbtk::Connection::New(slider,"Widget",
							         layout,"Widget1");

      bbtk::Connection::Pointer c2       = bbtk::Connection::New(text,"Widget",
							         layout,"Widget2");

      // Execution pipeline
      // ------------------

      // We have to pass the 'factory', in order to call automatically an adaptor,
      // if necessary.
      bbtk::Connection::Pointer s2t      = bbtk::Connection::New(slider,"Out",
							         text,"In",
							         factory);
      bbtk::Connection::Pointer c3       = bbtk::Connection::New(slider,"BoxChange",
                                                                 text,"BoxExecute");
      layout->bbSetInputWinDialog(true);

      // Go!
      // ---
      layout->bbExecute();

    }
  catch (bbtk::Exception e)
    {
      bbtk::MessageManager::SetMessageLevel("Error",1);
      e.Print();
    }
}

In this code, we use the headers of the \texttt{bbwx} \CPP library,
which define the black boxes of the \texttt{wx} package.

to be continued ...
6 bbs language reference
6.1 Pipeline creation and execution related commands
Table 1:
bbs pipeline creation and execution related commands.
| Command | Parameters | Effect |
| new | <box-type> <box-name> | Creates a box of type box-type and name
box-name. |
| newgui | <box-name> <gui-box-name> | Automatically creates a graphical user interface with name gui-box-name
for the black box box-name and connects it to the box inputs |
| delete | <box-name> | Destroys the box named box-name |
| connect | <box1.output> <box2.input> | Connects the output
output of the box named box1
to the input input of the box named box2 |
| set | <box.input> <value> | Sets the input input of
the box named box to the value value.
An adaptor must exist
in the packages loaded which converts a std::string
to the type of the input input. |
| exec | <box-name> | Executes the box named box-name.
If needed the boxes
connected to its inputs
are also processed recursively (pipeline processing). |
| freeze | Allows to block execution commands while keeping definition commands active (this one is not for end user) |
| unfreeze | Turns back to 'normal' mode (this one is not for end user). |
6.2 Package related commands
Table 2:
bbs package related commands.
| Command | Parameters | Effect |
| include | <package-name> | Loads the package package-name and includes all its complex box definition scripts. |
| load | <package-name> | Loads the atomic black boxes of package package-name.
Loads the dynamic library but not the complex boxes defined in the scripts shipped with the package.
Use it only if you know that you won't work with its complex black boxes |
| unload | <package-name> | Unloads the package package-name.
The package must have been previously loaded.
No box of a type defined in this package must still exist. |
| reset | - | Deletes all boxes and unloads all packages so
that the interpreter gets back to its initial state |
| package | <package-name> | All complex black boxes definitions until the next endpackage
will be stored into the package package-name |
| endpackage | - | Closes a package command |
6.3 Interpreter related commands
Table 3:
bbs intepreter related commands.
| Command | Parameters | Effect |
| help | - | Prints help on available commands |
| <command-name> | Prints help on the command command-name |
| packages | Prints help on available packages and their box types
(without description) |
| <package-name> | Prints help on the package package-name and its boxes
(with brief description).
The package must have been previously loaded |
| <box-type> | Prints help (with full description) on the type of box
box-type.
The box type must belong to a package which has been previously loaded |
| message
| - | Prints information on available kinds of messages and their current level |
| <kind> <level> | Sets the level of verbosity of the interpreter for the kind of messages
kind to level. |
| include | <file-name> | Includes and executes the content of the file named file-name
exactly like if you were typing its content at the place were the
include command is. |
| print | <string> | Prints the string after substituting each token of the form $box.output$ by the adaptation to string of the value of the
output output of the box named box.
An adaptor must exist
in the packages loaded which converts
the type of the output output
to a std::string.
|
| graph | ... | Generates the html doc including the pipeline graph for a given complex box |
| index | ... | Generates the html index of currently loaded boxes types |
| config | - | Displays the configuration parameters |
| debug | <debug-directive> | [expr - -C - -D]
Prints debug info on living bbtk objects containing the string expr (default expr=").
-C checks the factory integrity.
-D turns on objects debug info after main ends |
| quit | - | Exits the interpreter |
6.4 Complex black box definition related commands
Table 4:
bbs complex black box definition related commands.
| Command | Parameters | Effect |
| define | <box-type> [<package-name>] | Starts the definition of a complex black box of type
box-type. If <package-name> is provided then includes the
box in the given package (otherwise it is defined in the current package,
i.e. user if outside a package/endpackage block). |
| endefine | - | Ends the definition of a complex black box type |
| author | <string> | Concatenate the string to the author string
of the current complex black box. |
| description | <string> | Concatenate the string to the description of the current complex black box.
|
| category | <string> | Specifies the categories of the current complex black box.
The categories must be separated by semicolons, e.g. "widget;image" |
| kind | <box kind> | Specifies the kind of the current complex black box
( ADAPTOR, DEFAULT_ADAPTOR, WIDGET_ADAPTOR, DEFAULT_WIDGET_ADAPTOR ) |
| input | <name> <box.input> <help> | Defines a new input for the current complex black box,
named name.
It is defined as corresponding to
the input input of the box box.
<help> is the help string for the new input.
The box box must already have been created in the complex box
and of course have an input named input. |
| output | <name> <box.output> <help> | Defines a new output for the current complex black box,
named name.
It is defined as corresponding to
the output output of the box box.
<help> is the help string for the new output.
The box box must already have been created in the complex box and of course have an output named output. |
Note : if outside a define/endefine block then the current complex black box
is 'user::workspace', that is the main program equivalent
(this is how applications are documented).
This remark holds for all complex black box related commands.
7 Install and run time issues
7.1 bbtk configuration file
At start, bbtk applications (bbStudio , bbi ) try
to open an xml
configuration file named bbtk_config.xml.
The search order is
- The current directory
- The subdir .bbtk of the user's home directory.
- On Unix, the home directory is the
one stored by the environnement variable HOME,
typically /home/username.
- On Windows, the home directory is
the user's profile directory stored by the environnement
variable USERPROFILE,
typically C:\ Documents and Settings\ username.
- If none of these two paths contains the file then it creates
a new one in the .bbtk directory.
Information on bbtk configuration is
obtained in bbStudio by clicking on the
Config button of the Command part toolbar.
If you did not installed other packages than the ones
provided by bbtk , you get something like :
 =============
 Configuration
 =============
 bbtk_config.xml    : [/home/guigues/.bbtk/bbtk_config.xml]
 Documentation Path : [/usr/local/bin/../share/bbtk/doc]
 Data Path          : [/usr/local/bin/../share/bbtk/data]
 Temp Directory     : []
 File Separator     : [/]
 BBS Paths
 --- [.]
 --- [/usr/local/bin/../share/bbtk/bbs]
 PACKAGE Paths :
 --- [.]
 --- [/usr/local/bin/../lib]
The first line let you know which configuration file is currently used.
You can open this file using bbStudio menu Files > Open bbtk Config file.
You will get something like :
<?xml version=\"1.0\" encoding=\"iso-8859-1\"?>
<config>
  <bbs_path>     </bbs_path>
  <package_path> </package_path>
</config>
The xml tags bbs_path and package_path
allow to set additionnal directories in which to search
for bbs files and packages dynamic libraries.
For example, if you add the line :
<bbs_path> /home/guigues/bbs </bbs_path>
Then the interpreter will search for bbs in the folder /home/guigues/bbs,
which allows a command like 'include bbMyBox.bbs' to work if
the folder /home/guigues/bbs contains the file bbMyBox.bbs.
The same, the xml tag <package_path> let you
set additional path in which to find a package dynamic library,
hence allowing to load additionnal packages with the 'load' command.
All bbs and package paths are summmarized in the
information output when pressing 'Config' in bbStudio .
You can see that two bbs paths are always set :
- The current directory (.)
- The bbs folder of bbtk
Also, two package paths are always set :
- The current directory (.)
- The libraries folder of bbtk
Additional paths set in your bbtk_config.xml are added after those standard paths.
Note that the order displayed is the one in which the folders are searched when
include or load commands are issued.
- bbStudio is written using the Advanced User Interface library of wxWidgets.
If, after some hazardous floating/docking operations onto the frame, you feel
very unhappy with the result, just remove from the hidden directory
.bbtk the file named bbStudio.aui.
Footnotes:
1Yes, we know : all the arrows (graphical interface pipeline arrows and data processing arrows)
are blue; using different colors is planned for next release...
File translated from
TEX
by
TTH,
version 3.81.
On 12 Nov 2008, 11:39.